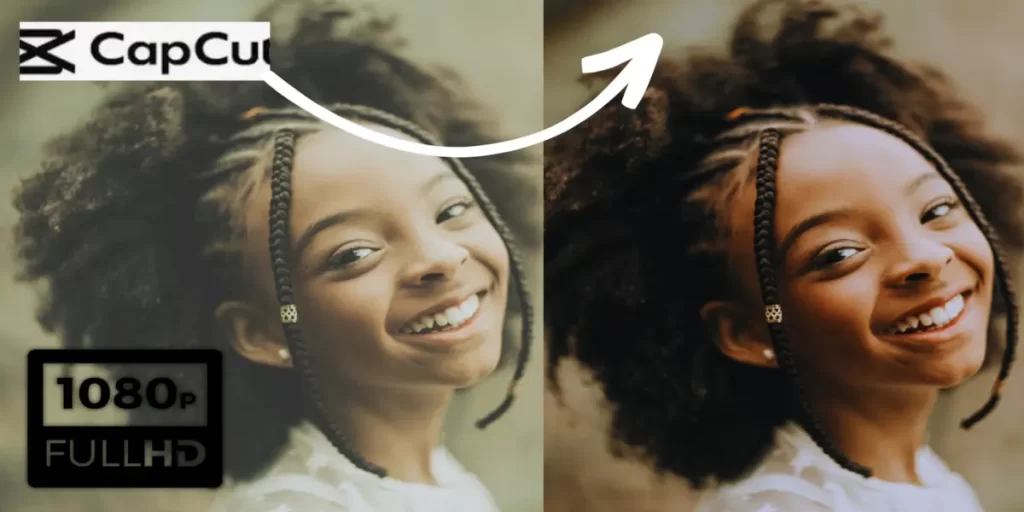
Best Tips & Guide To Convert Normal Video Clip to High Quality in Capcut
We are living in an era where everything is at your fingertips. The power of social media has revolutionized the ways of our living. People these days are more comfortable with sharing their personal life on social media.
They are not afraid now you can now learn about a person through his social media accounts and everyone is watching the daily lives of each other. So we try to share or upload such content on our social accounts that are visually appealing and memorizing.
We try to keep our content look cool and pleasant for others whether it is a photo or a video we want the best quality. That is why we are talking about such software today that is not only for making your content beautiful but also helps in making its quality better than the original.
Today you will learn to convert Normal Video Clip to High Quality in CapCut so that your friends online can get to see more enhanced content from you. Believe me, they will your video. Keep reading to know more about Capcut and its video conversion method.
Is It Good To Convert Normal Video Clip to High Quality in Capcut?
Capcut is the most used software for video editing among social media enthusiasts and tik tokers. It has a lot of different features covering every aspect to make your content visually stunning and wonderful.
One of many features is to convert normal video clip to high quality in Capcut with so much ease and comfort. The user interface is friendly and provides you full access to your content conversions.
So yes it is one of the best to convert the quality of your video to better ones and even more vivid and brighter than before.
Tips To Convert Normal Video Clip To High Quality in Capcut
If you want to convert your videos more efficiently here are some tips to consider. Sometimes we are using bad quality content and blaming the software is not good. So keep these things in mind.
To achieve the best result keep in mind that:
1. Choosing A Video Converter
Choose a video converter that gives you full access to your photos or videos. Also, it is necessary to have all features unlocked just like Capcut gives you full access for free.
Some software gives you access to features but is limited in output. Some are good for export quality but lack a few necessary features making it frustrating after so much hard work and still, you had nothing.
So always use Capcut for premium quality content for free.
2. Optimize Video Setting
Always keep in mind the original quality of your video before exporting it in high quality. If your genuine video lacks the ideal quality for the best export quality. You are wasting your time.
Aspect Ratio
Shoot your videos in the best aspect ratio to maintain the export quality. If your video does not have a good aspect ratio you can have bad export quality in terms of stretched and distorted video content.
Audio Quality
Keep your audio quality better use good quality Mics while recording. Use tools and audio settings to remove noise and enhance the sound quality when converting the video.
Basic Editing
Do not forget to do initial video settings such as cropping or trimming the unwanted parts.
How To Convert Normal Video Clip To High Quality in Capcut?
There are 3 main parts to convert normal video clip to high quality in Capcut and each is divided into a few more steps. This way you can do it more efficiently and missing any important parts. Let’s get to it.
Downloading: Make sure to install the latest version of Capcut on your device.
Uploading
Locating Your Video: Launch the software on your device and click on “Create new project”.
Import from Gallery: After clicking on Create a new project you will be asked to locate your desired video.
Go to the folder where you have saved your video and click or tap on the import button to import your original video.
1. Editing
Now that you have imported your video it’s time to do some enhancement to make its quality and visuals better for your audience. Here are some key points to do it.
These instructions may vary a little on behalf of any new update.
Color Adjustments
To get high-quality results you need to do some color adjustments. Click on the adjustment option and there you will find brightness, saturation, contrast, hue, temperature, grain, and much more options to adjust your video quality than before.
Experiment with these options to get the desired result.
Crop & Resize
- Crop: If there are any unwanted parts in your video you can remove and trim them by simply cropping those parts.
- Resizing: This is the best feature of Capcut I liked the most because you can resize your video’s aspect ratio for desired platforms like a 9:16 ratio for tik tok, 1:1 for Instagram, and 16:9 for youtube
2. Effects & Filters
Capcut is known for its best-quality filters and special effects among all content creators.
- Filters: Apply different types of filters each filter supports a specific mood and environment. Select the one that fits on your video.
- Effects: Effects are different kinds of moods and modifications to enhance the visual quality of your videos.
- Stabilizing your video: If your video is shaky you can stabilize the footage by using stabilizing video feature trending on Capcut.
- Text and Emojis: You can always use text and emojis to create more sense of your video and make it funkier if you want to.
3. Transition & Music
Professional content creators know the importance of music and transitions as they are the key aspect of your video quality.
Transitions: This help to make the flow of your video better and eye-catching. You can use fade in, out, zoom, slide, dissolve, rotation, and many more transitions for your video for free.
Music: Make some audio adjustments before exporting your video without good quality audio a video is nothing but total crap.
You can reduce noise or can add background music to your videos.
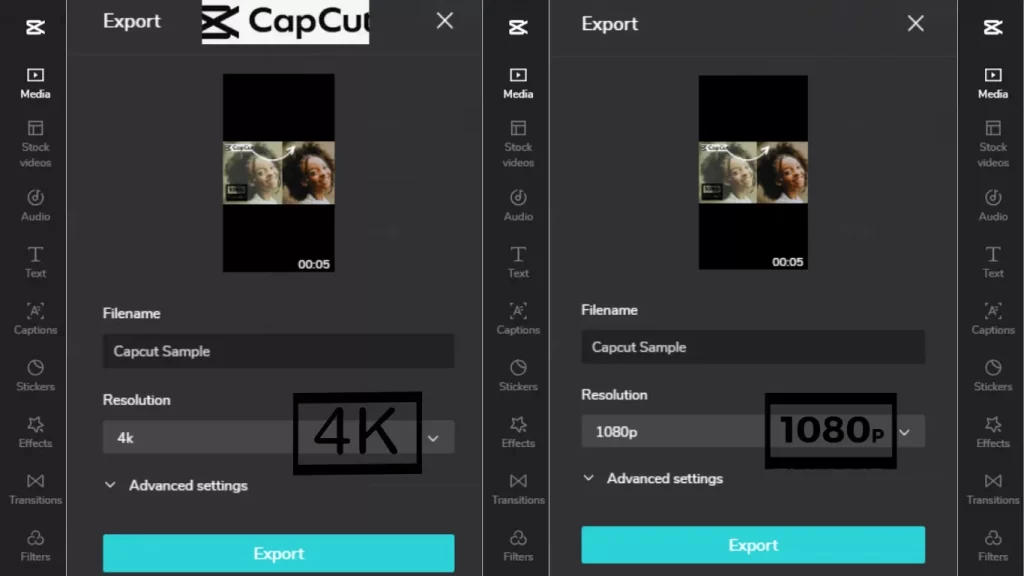
4. Export
Now take a better look at the settings you have made to your videos. It’s time to export the video. You can export in different types of formats making Capcut ideal to use.
Select your desired resolution and format and export for different platforms.
Format: Capcut supports almost every video format so feel free to use it.
Conclusion
This article will give you the most satisfying and fantastic A to Z tips to Convert Normal Video clips to High Quality in CapCut.
Remember the above tips for exporting better quality video and follow the steps to make it more excellent and eye-catching.
You can enhance your video quality and change its aspect ratio, select desired resolution, and export in multiple formats for different platforms like Facebook, youtube Instagram, and Tik Tok.